Introduction
Podcasting and digital audio recording have exploded from niche hobbies into mainstream content industries. Yet the technical decisions can feel overwhelming for beginners, hobbyists and even professionals.
Answer a few questions (Choosing Your Input Path Section below) and our free tool helps you choose your perfect setup.
Should you choose a plug‑and‑play USB mic or build a modular XLR setup? Why do some recordings sound crisp and intimate while others echo like they were recorded in a tiled bathroom? Understanding the fundamentals of signal flow, microphone types and room acoustics will help you build an affordable setup that scales with your ambitions.
This guide demystifies podcast and audio recording digital tools and devices, explaining how each piece of gear fits into your workflow and offering practical recommendations for different budgets and skill levels. Throughout the guide you’ll find prompts where you can add links to recommended products.
Getting Started: What You Need to Know
🎙️ Podcast Stack Recommender
Answer 4 quick questions to get your personalized podcasting setup recommendation
Continue your podcasting journey with these in-depth guides from DigitalToolsHub:
The Signal Chain
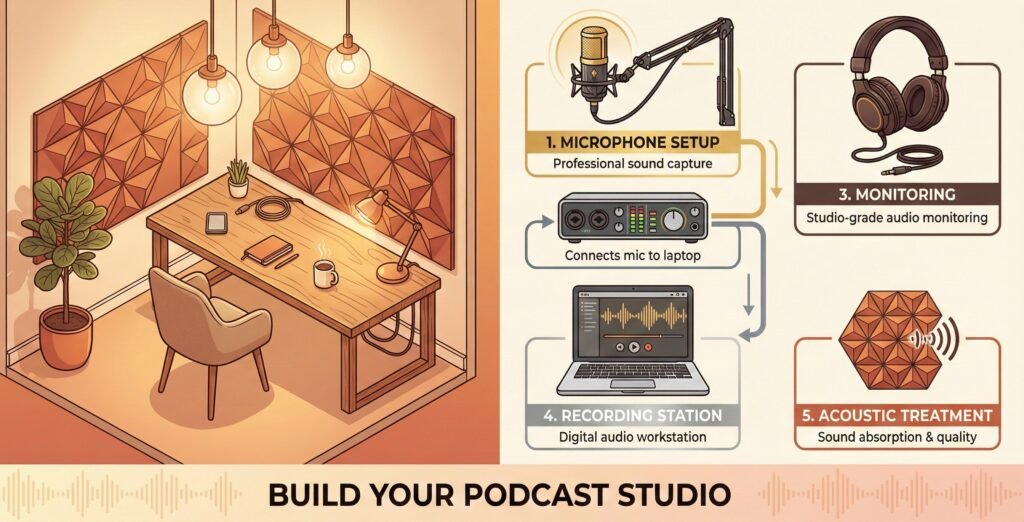
Before buying any gear, it helps to understand the signal chain—the path your voice travels from your mouth to a finished recording. When you speak, sound waves hit the microphone diaphragm, which converts those vibrations into an electrical signal. That signal travels through a cable to a preamp (often inside an audio interface), where it is amplified to line level and converted from analog to digital data. A digital audio workstation (DAW) records the data so you can edit and export your final file. Each link in this chain affects your final sound, so optimizing the weakest link yields the biggest improvement.
USB vs. XLR: Choosing Your Input Path
USB microphones combine a microphone capsule, preamp and analog‑to‑digital converter in one unit. They plug directly into your computer and require minimal setup. Models like the Audio‑Technica AT2020USB+, Rode NT‑USB or Blue Yeti are ideal for solo creators or side‑hustlers who record in a fixed location. The simplicity eliminates learning curves around gain staging and phantom power.
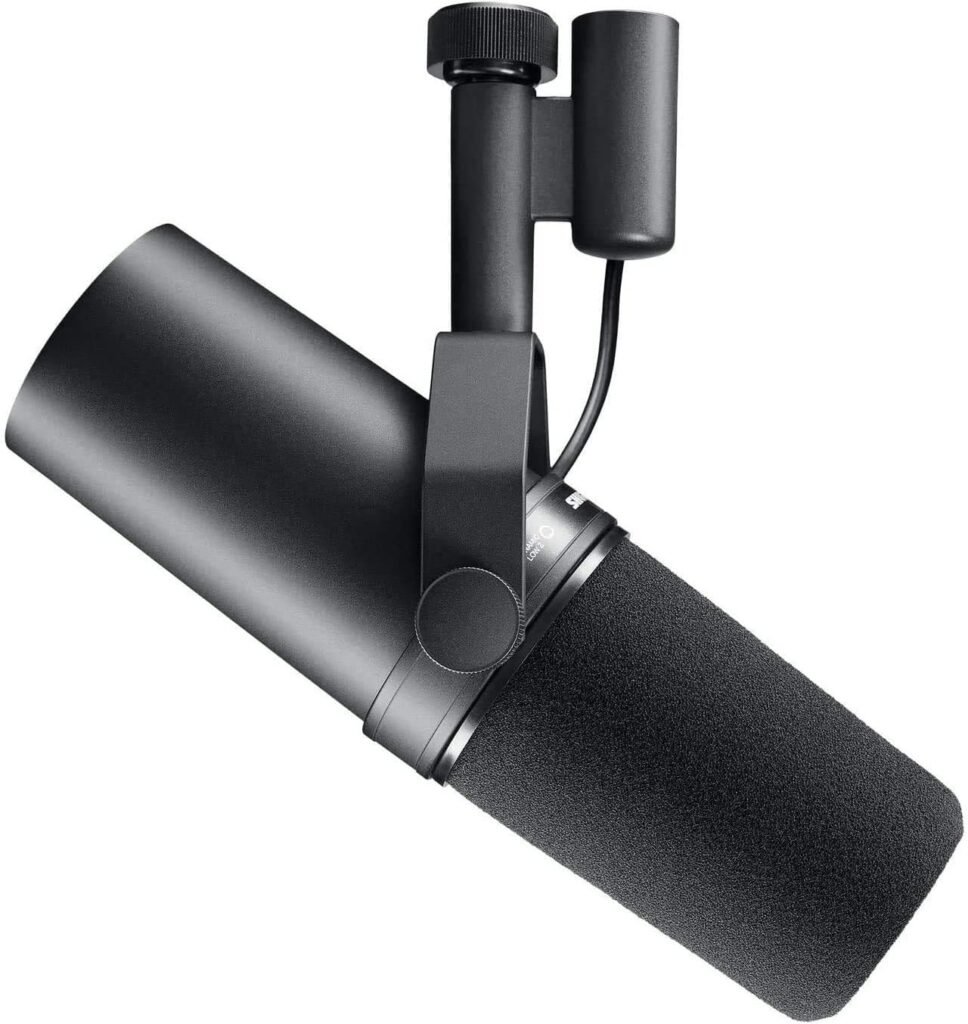
XLR systems separate the microphone from the interface. You connect an XLR microphone (such as the Shure SM7B or Electro‑Voice RE20) to an audio interface or mixer that provides phantom power for condenser mics, preamplification and conversion to digital. This modular approach offers flexibility—upgrade individual components, add multiple microphones, or use the mic for live performance or field recording. While XLR setups require more equipment and knowledge up front, they scale better if you plan to record multiple hosts or guests.
Scroll down to the appropriate links your recommended tools (Recommended Tools & Devices section). You would get coupon codes and discounts where applicable.
Dynamic vs. Condenser Microphones
Choosing the right microphone type influences how your recordings sound in your specific environment. Dynamic microphones use electromagnetic induction and have lower sensitivity, which makes them excellent at rejecting room noise and handling high sound pressure levels. They’re durable and forgiving; the Shure SM58 and SM7B are famous examples. Dynamic mics are ideal for untreated rooms, live environments or loud sources because they capture mostly the direct sound and less ambience.
Condenser microphones use a capacitor design that requires phantom power. They capture more detail and nuance, but they also pick up room reflections, computer fans and background noises. Large‑diaphragm models like the Audio‑Technica AT2020 sound beautiful in treated rooms but reveal every imperfection in an untreated space. Beginners often assume condensers are always better; in reality the “best” mic depends on matching the mic’s sensitivity to your room acoustics and voice.
Sample Rate and Bit Depth
You’ll see specifications like 48 kHz/24‑bit on audio interfaces and recorders. Sample rate is how many times per second the audio is captured; bit depth is the resolution of each sample. Human hearing tops out around 20 kHz, and sample rates of 44.1 kHz or 48 kHz capture the necessary frequency range. Many podcast directories such as Apple Podcasts recommend recording at 44.1 kHz or 48 kHz and using 24‑bit resolution. Higher sample rates (96 kHz, 192 kHz) increase file size without audible benefits for voice, so 48 kHz/24‑bit is the sweet spot.
Understanding Audio Interfaces
If you choose an XLR setup, you’ll need an audio interface. An interface converts analog signals to digital, provides preamps and phantom power for mics, and handles monitoring. Good interfaces improve sound quality, offer multiple inputs and reduce latency. Affordable models like the Focusrite Scarlett Solo or Scarlett 2i2 offer low‑noise preamps and simple controls. Higher‑end units such as the Universal Audio Volt series emulate vintage circuitry and provide more headroom. Whether you start with an entry‑level interface or invest in premium gear depends on your long‑term goals.
Why Acoustic Treatment Matters
Room acoustics can make or break your recordings. Acoustic treatment is often confused with soundproofing. Soundproofing blocks outside noise from entering or exiting a room, whereas acoustic treatment controls reflections and resonances within a room. Foam panels, bass traps and diffusers fall into the treatment category. Reflections off hard surfaces create echo and hollow tone; absorbing them with panels or curtains reduces comb filtering and yields a cleaner recording. Place bass traps in room corners where low frequencies build up and absorption panels at first reflection points (where sound bounces off walls before reaching the microphone). Even DIY solutions like blankets or duvets hung on walls can improve your recording environment.
Step‑by‑Step Process
1. Plan Your Content and Workflow
Begin by defining your format—solo host, co‑hosted show, interview series or narrative storytelling. Outline episode structures and determine if you’ll need multiple microphones or remote recording tools. Planning helps you choose appropriate equipment and avoids costly upgrades later.
2. Select Your Microphone and Interface
For solo or remote podcasting, start with a quality USB microphone. Consider the Audio‑Technica AT2020USB+ or Rode NT‑USB. They provide respectable sound, simple setup and low cost. Use a sturdy boom arm and pop filter for positioning and plosive control (see our accessory section below).
For multi‑host shows or professional flexibility, invest in an XLR microphone such as the Shure SM7B, Electro‑Voice RE20, Rode Procaster or a budget‑friendly Audio‑Technica AT2040. Pair it with an interface like the Focusrite Scarlett 2i2 or Universal Audio Volt 2. This combination lets you upgrade components individually as your needs evolve. (Affiliate CTA prompt: Insert your affiliate link for the recommended microphone/interface here.)
3. Set Up and Treat Your Recording Space
Identify a quiet location with minimal background noise. Avoid rooms with lots of hard surfaces; carpets, curtains and bookshelves help reduce reflections. Add acoustic panels or hang heavy blankets at first reflection points and in corners to tame bass build‑up. Place your microphone on a boom arm to achieve consistent positioning and avoid bumping the desk (more on accessories later). If you’re in a noisy environment, dynamic microphones will reject more ambient sound.
4. Connect and Configure Your Equipment
- USB Setup: Plug your USB microphone into your computer and select it as the input in your DAW. Adjust the gain on the microphone or in software to keep your loudest speech peaking between –12 dB and –6 dB. Disable automatic gain control so the mic doesn’t pump your audio.
- XLR Setup: Connect your XLR microphone to your audio interface using an XLR cable. Enable phantom power (+48 V) for condenser microphones but turn it off for dynamic mics. Set the gain knob while speaking at your loudest volume so peaks remain around –6 dB. Monitor through headphones plugged into the interface and disable any onboard effects or auto‑leveling.
5. Record Cleanly
Position the microphone 6–8 inches from your mouth; dynamic microphones allow closer placement with less proximity effect, while condensers capture detail at slightly greater distances. Speak across the mic (slightly off‑axis) to reduce plosives and sibilance. Wear closed‑back headphones to monitor your recording—open‑back headphones are comfortable for editing but leak sound during tracking.
Maintain consistent distance and posture. Keep reference notes at eye level to prevent leaning away from the mic. Record in segments and pause when mistakes occur; you can edit seamlessly later. Always record a backup track if possible—most portable recorders and DAWs allow redundant recording.
6. Edit and Process Your Audio
Use a DAW to trim silences, remove mistakes and adjust levels. Free software like Audacity and GarageBand is sufficient for most podcasts; professional DAWs like Adobe Audition, Reaper or Logic Pro offer advanced tools like spectral editing and multitrack mixing. Normalize your audio to a consistent loudness (around –16 LKFS) to meet streaming standards. Apply light compression, EQ and noise reduction as needed, but avoid heavy processing—great recordings start with proper capture, not post‑production magic.
7. Export and Publish
Export your final mix to 16‑bit/44.1 kHz or 24‑bit/48 kHz WAV for archiving, then compress to 128–192 kbps MP3 for distribution (or the format required by your host). Write engaging show notes, include affiliate links where appropriate and promote your episodes through social media and mailing lists. Many hosting platforms will automatically generate an RSS feed and push your show to major directories.
Common Mistakes to Avoid
- Recording with Automatic Gain Control (AGC): AGC continuously raises and lowers your input level, causing pumping effects and inconsistent volume. Always disable AGC and set your gain manually to peak between –12 dB and –6 dB.
- Using a Condenser in an Untreated Room: Condenser mics capture every reflection and noise. Dynamic mics like the Shure SM7B or Audio‑Technica AT2040 are better for untreated spaces.
- Ignoring Acoustic Treatment: Foam panels alone don’t block sound; you need absorption panels and bass traps at key points. Improvised treatments like thick curtains also help.
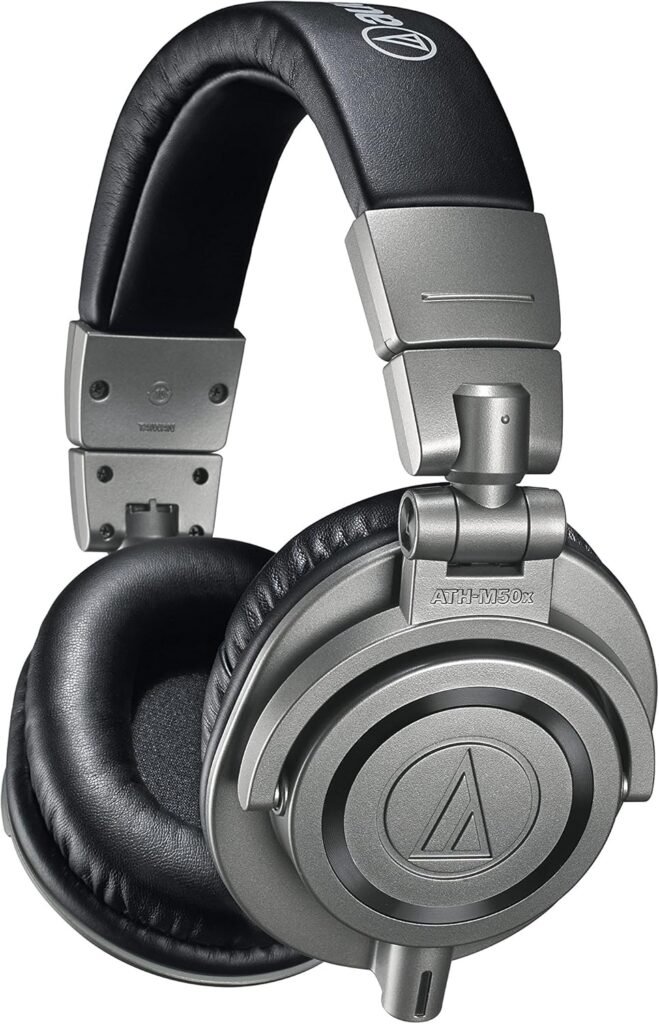
- Not Monitoring While Recording: Always wear closed‑back headphones so you can hear plosives, pops, clipping and interference in real time. Inexpensive studio headphones like the Sony MDR‑7506 remain industry standards due to their neutral sound and reliability, and the Audio‑Technica ATH‑M50x offers accurate audio with deep bass response and good isolation. (Affiliate CTA prompt: Insert your affiliate link for headphones here.)
- Poor Microphone Positioning: Sitting too far from the mic leads to thin, echoey sound and more background noise. Sitting too close causes plosives and muddy tone. Aim for a steady 6–8 inch distance and speak slightly off‑axis.
Advanced Tips and Strategies
Multi‑Mic and Interview Setups
If you plan to record in‑person interviews, choose an interface with multiple inputs (e.g., Focusrite Scarlett 4i4 or Zoom H6) and dynamic microphones for each speaker. Place microphones on boom arms so guests can sit comfortably without moving around. When multiple mics are in the same room, use cardioid or hyper‑cardioid patterns to minimize bleed, and position each mic to reject the others’ sound. Consider using a portable recorder like the Zoom H5 or H6 for on‑location interviews; these devices have XLR inputs and built‑in mics, making them versatile for field work.
Remote Podcasting
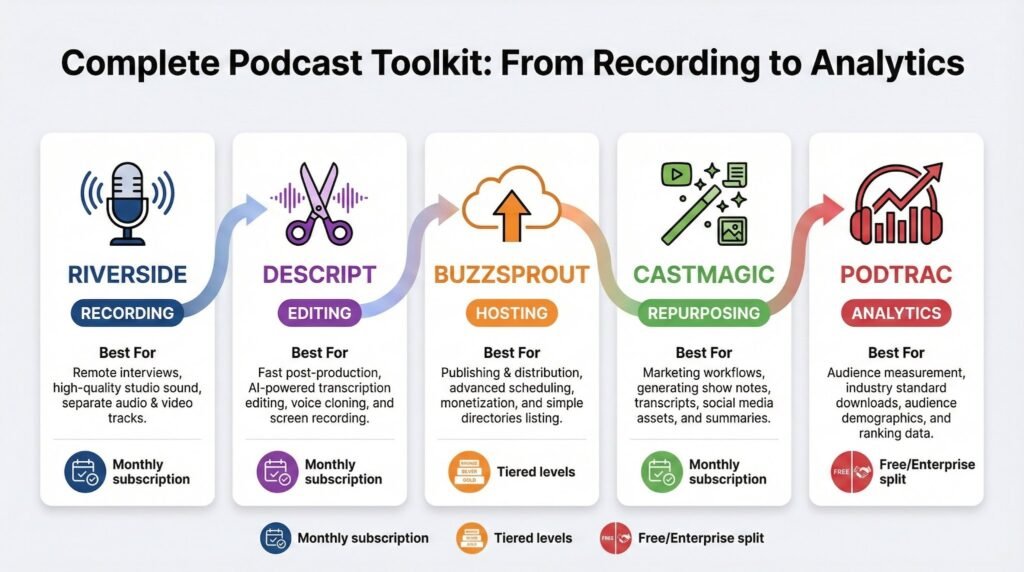
Remote interviews require software like Riverside.fm, SquadCast or Zoom. Each participant should record a local track (either through the platform or by recording themselves in their DAW) to preserve quality; this is known as a double‑ender. Provide guests with guidelines: use headphones, speak close to the mic, and record in a quiet room. After the interview, align and sync tracks in your DAW.
For a detailed overview of affordable tools for remote podcasting, read this article:
Top Digital Tools for Podcasters and Audio Creators in 2026.
Monitoring and Headphone Choice
Your headphones are your reference monitors. Closed‑back headphones like the Audio‑Technica ATH‑M50x offer accurate audio with deep bass and prevent bleed. The Sony MDR‑7506 is another long‑time studio standard known for its neutral sound and reliability. Open‑back headphones are great for mixing but can leak audio during recording; they are best used for editing after tracking.
Acoustic Treatment Beyond Panels
If you have the budget, invest in bass traps and diffusers. Bass traps in corners reduce low‑frequency build‑up, and diffusers scatter sound reflections to preserve a natural feel while minimizing echo. However, you don’t need to cover every square inch—40–60 % wall coverage is sufficient for most rooms. DIYers can build wooden frames with mineral wool and cover them in breathable fabric for cost‑effective panels.
Signal Chain Upgrades
Once your core setup is dialed in, incremental upgrades yield noticeable improvements. A high‑quality preamp (e.g., Grace Design m101 or Audient iD14) lowers noise and increases headroom. An external compressor or channel strip can smooth dynamics before the signal reaches your recorder. Upgrading your analog‑to‑digital converter improves clarity and depth. Each upgrade should target the weakest link in your current chain.
Backup Recording
Even experienced podcasters lose recordings to software crashes or computer glitches. Use a portable recorder like the Zoom H5 or Tascam DR‑40 as a redundant recorder while simultaneously recording into your DAW. Many recorders allow you to feed your interface’s line output into the device, creating an identical backup. This insurance policy saves frustration and lost interviews.
Recommended Tools and Resources
Microphones
- Legendary broadcast microphone with excellent noise rejection and smooth sound. Great for professional podcasters; requires a clean preamp or an inline booster like the Cloudlifter.
- Audio‑Technica AT2040 (Dynamic) –
- Affordable alternative to the SM7B; designed for podcasting with tight pickup pattern and warm tone. Good for small budgets. (Affiliate CTA prompt: Insert link here.)
- Electro‑Voice RE20 (Dynamic) –
- Another broadcast standard with variable‑D design that minimizes proximity effect and off‑axis coloration. Ideal for voiceover and professional studios.
- Rode NT‑USB (Condenser) –
- Plug‑and‑play USB mic with built‑in headphone jack and pop filter. Suitable for beginners and travel setups.
- Audio‑Technica AT2020USB+ (Condenser) –
- USB version of the popular AT2020; crisp sound and direct monitoring make it a reliable entry‑level choice.
Audio Interfaces
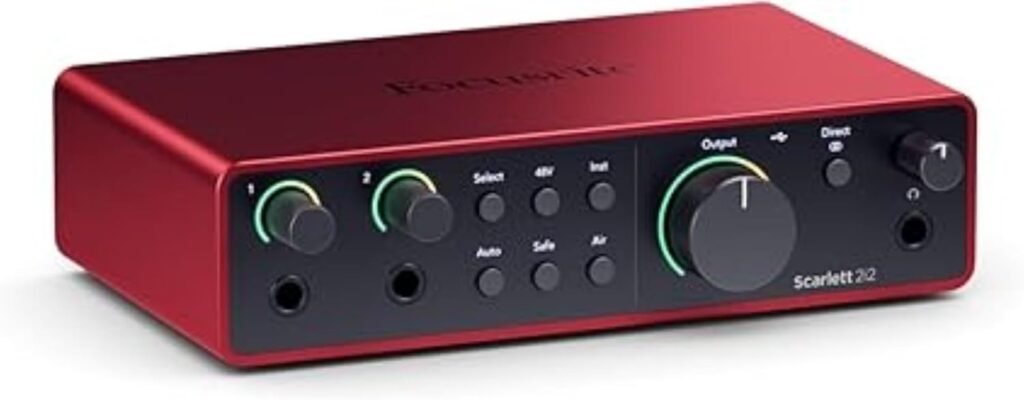
- Affordable interfaces with low‑noise preamps, phantom power and 24‑bit/192 kHz converters. Perfect for one or two microphones.
- Universal Audio Volt 2 / Volt 4 –
- Interfaces with built‑in vintage‑style analog circuitry for warmer tone; include onboard compressor emulations. Great for musicians and podcasters wanting analog character.
- Audient EVO 4 / 8
- – Interfaces featuring “Smartgain” for automatic gain setting and high‑quality preamps. User‑friendly and portable.
Portable Recorders
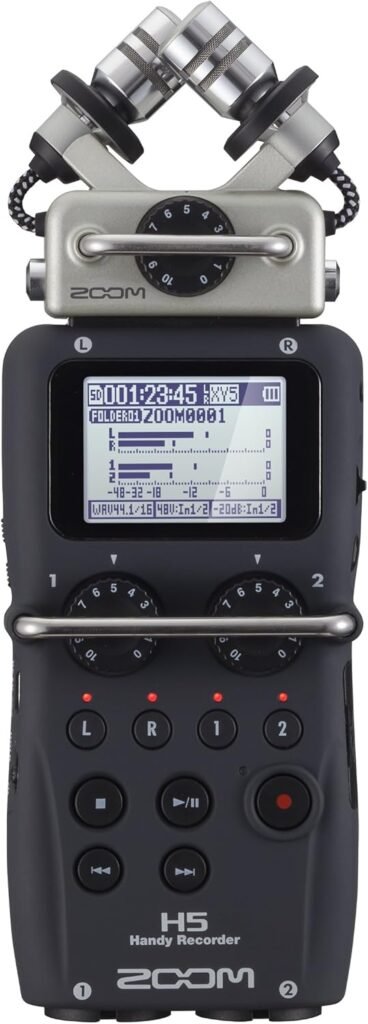
- Versatile handheld recorders with interchangeable microphones and XLR inputs. Provide high‑quality preamps and battery operation, ideal for field interviews.
- Tascam DR‑40X
- – Affordable four‑track recorder with built‑in mics and XLR inputs; includes dual recording mode for safety backups.
- Sony PCM‑D100
- – High‑end portable recorder with exceptional preamps and built‑in microphones. Overkill for most podcasters but great for serious field recording.
Accessories
Audio‑Technica ATH‑M50x Headphone
- Pop Filter – A circular mesh screen placed a few inches in front of the microphone that disperses bursts of air from plosive consonants like “p” and “b.” Pop filters reduce popping noises and protect your microphone diaphragm.
- Shock Mount – Suspends your microphone in elastic bands or a pneumatic cradle, isolating it from vibrations and handling noise. Essential when using boom arms or desk mounts to prevent thumps and rumbles.
- Boom Arm – Supports the microphone above your desk and allows precise positioning while freeing desk space. Boom arms reduce handling noise and help maintain consistent distance, improving vocal consistency.
- Headphones – Studio headphones with a flat frequency response are crucial for accurate monitoring. The Sony MDR‑7506 remains a best‑selling professional headphone due to its neutral sound and reliability. The Audio‑Technica ATH‑M50x offers accurate audio and deep bass with excellent isolation.
Software and Resources
- Audacity (Free) – Basic recording and editing software with noise reduction, compression and EQ tools. Great for beginners. I used this a lot when I was even a voice over artist. You can learn about how to use it on YouTube (free).
- GarageBand (Mac)
- – Free DAW with a user‑friendly interface; perfect for Mac users starting out.
- Reaper – Affordable, fully featured DAW with a generous free trial. Offers flexible routing and extensive plugin support.
- Adobe Audition
- – Subscription‑based professional DAW with spectral editing, multitrack mixing and podcast‑specific loudness normalization.
- Online Training – Sites like Coursera, Skillshare and YouTube offer courses on podcast production, microphone technique and audio editing. Investing time in education often yields better results than chasing expensive gear.
Conclusion and Next Steps
Podcasting and audio recording are accessible to anyone willing to learn the basics. By understanding the signal chain, matching your microphone to your environment and optimizing your weakest link, you can achieve professional‑sounding results on a realistic budget. Start simple with a quality USB microphone and headphones if you’re dipping your toe in, or build a modular XLR setup if you plan to grow your show. Remember that your content and delivery matter more than gear; invest in storytelling, planning and engagement. As your skills improve, incremental upgrades in microphones, interfaces, acoustic treatment and monitoring will enhance your production quality.
What equipment do I need to start a podcast?
At minimum, you need a microphone, headphones, a computer, and recording software. USB microphones are ideal for beginners, while XLR microphones with an audio interface offer more flexibility for growth.
Is a USB or XLR microphone better for podcasting?
USB microphones are easier to set up and cost-effective for solo creators. XLR microphones provide better scalability, cleaner signal paths, and support multi-mic setups for professional podcasts.
What sample rate and bit depth should I record podcasts at?
Recording at 48 kHz and 24-bit is the recommended standard for podcasting. It balances audio quality and file size and is widely supported by podcast platforms.
Do I need acoustic treatment for podcast recording?
Yes. Acoustic treatment improves clarity by reducing reflections and echo. Even simple solutions like curtains, rugs, or DIY panels can significantly improve audio quality.
Which microphone type is best for untreated rooms?
Dynamic microphones are better for untreated rooms because they reject background noise and room reflections more effectively than condenser microphones.
Affiliate Disclosure:
Some of the links in this guide are affiliate links. This means we may earn a small commission if you choose to purchase through those links—at no additional cost to you. We only recommend tools and equipment that are relevant to podcast and audio recording workflows and that we believe offer long-term value to creators.